Wednesday, March 28, 2012

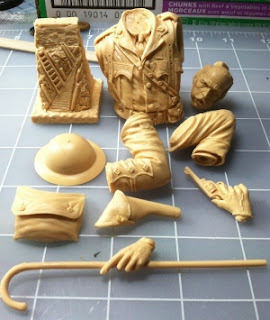
"Over the Top" - The Kit


I saw this kit on planetFigure a few weeks ago and just had to get it. Even though I haven't done a figure/bust in years, this one really caught my attention.

It's a 1/9th scale bust of a Captain of the 2/5th Bn. Gloucestershire Regiment, 61st Div., 1916. Sculpted by Carl Reid for Model Cellar, it depicts the good captain counting down to "zero hour", pistol and walking stick in-hand and whistle ready to blow to sound the attack. The plinth depicts the empty trench section a few seconds later after he and his men have gone "over the top."

Once my M8 is finished, this just might be next up!

Thursday, March 22, 2012

M8 Greyhound - Base Coats


The underneath parts were airbrushed with Vallejo Model Air Olive Drab (71043) and a couple drops of thinner: inside the rear fenders, wheels, and turret and the underneath areas of the hull assembly and gun assembly. I then lightened the olive drab with Model Air White (71001) by adding 2-3 drops of the white to the airbrush cup and stirring to mix. This was then sprayed on the turret basket, the outside of the fenders, wheels, and turret and the upper surfaces of the gun assembly and hull assembly. The ring portion of the turret basket will be brush-painted off-white.

I'm not sure that I have enough contrast so my plan is to lighten the olive drab even more and highlight the flat, upper surfaces on the hull and the upper part of the fenders. Once totally dry, I will then gloss coat the areas for the markings and apply them, followed by weathering.

Tuesday, March 20, 2012

M8 Greyhound - Primer Coat


Final painting was begun with a light grey primer coat. Instead of panzer grey or black, I opted to use AK Interactive's Airbrush Grey Primer (AK-003). I'd forgotten that I had a bottle of this in one of my AK sets. I sprayed it straight (no thinner, etc.) through my Grex airbrush at 15 psi static with no issues whatsoever.

You can see the various components in the photo above: main hull, turret basket, turret, gun assembly, rear fenders, and wheels. Next up is the base coat of olive drab.

Friday, March 16, 2012

M8 Greyhound - Prepaint


The exterior is complete and ready for the "soap 'n' water" treatment to remove oils and other gunk. Then it's on to the air brush and a primer coat. Here's another view of the hull, this time from the rear:


Also ready for washing and priming are the turret, turret basket, gun assembly, rear fenders, and wheels. My plan is to attach the rear fenders but not the front. I was going to leave off the rear fenders, too, but most of the "cool" French markings are on the rear fenders. So, they stay! I'll post pictures to try to illustrate the steps in painting and weathering.

As the overall paint color is olive drab I'll prime with a darker color to serve as a pre-shade. I thought I had a new bottle of Vallejo Black Primer but I don't, so I'll use either the Vallejo Panzer Grey Primer (73603) or the Vallejo Model Air Black (71057). We'll see what kind of mood I'm in when I pick-up the air brush.

Wednesday, March 7, 2012

M8 Greyhound - Interior


Finally, the interior is complete and ready to be "buttoned-up." The walls were air-brushed with Vallejo Model Air White (71001) and the floor with Vallejo Model Color USA Olive Drab (70889). Washes were done using both burnt umber and unbleached titanium oil paints mixed with Turpenoid. I know some of the lighter wash looks garish, but that is due to the brightness of the lights and the camera. Here's a view of the rear wall:


While finishing the interior, I have also been working on the turret, turret basket, and main gun:


Once the hull is closed-up I can begin finishing the outer hull and completing the turret. Then comes final painting, decaling, and weathering!